|
|
|
Selecting Parts From Drawings
This method is useful if you know what the part looks like and the position of the part in the vehicle zone. If you hover the mouse cursor over a part, the system will display both the guide number and part description.
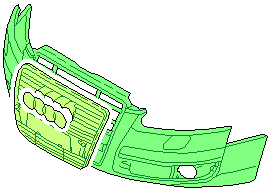
To further help you in your selections, the system applies shading to parts according to their material properties. For example, the system applies shading to plastic parts to help you to distinguish these from non-plastic parts and applies further shading according to whether the plastic part can be painted or not. You can review a guide to the highlighting and shading that the system applies to parts by clicking ![]() in the Vehicle Drawings Panel. In the following example, the front bumper and grill are shown. Notice that the grill is shaded with a lighter green to indicate that it cannot be painted:
in the Vehicle Drawings Panel. In the following example, the front bumper and grill are shown. Notice that the grill is shaded with a lighter green to indicate that it cannot be painted:
- Click a vehicle zone from the Zone Navigation tab.
➀ Alternatively, you can click the navigation vehicle in the Toolbar
 and then click the area of the vehicle in the Vehicle Drawings Panel that best corresponds to the zone you wish to capture damage in. If there is more than possible zone, the system will ask you to select one from the Resolve Zone Ambiguity dialog box.
➁ Click in the Toolbar to move to the next zone or
  to move to the previous vehicle zone.
 - Click the desired part. The drawing of the selected part is highlighted.
➀ If you select a part and there are either variants or it is a part that is common to both sides of the vehicle, the system will display the Selection of Multiple Parts dialog box. You must select the desired part in the dialog box. You can do this in one of two ways. You can click the part to highlight it and then click OK or you can simply double-click the part.
➁ A Black circle indicates that a part can be partially replaced or replaced. See How to Replace a Portion of a Vehicle Part. A black square indicates a part can be partially painted. See How to Partially Paint a Vehicle Part. A black triangle indicates that a part might need to be prepared for painting.
➂ In 3D capturing mode, when you click a part that is true to original displays in the Repair Panel.
➃ If configured, you can quickly determine whether a part exists in more than one vehicle zone by clicking in the Repair Panel. This opens the Search Results dialog box, which shows the zones the part belongs to. If you wish to switch to a different zone, either double-click the zone or click the zone to highlight it and click .
 - Select a repair and/or paint method. Refer to Selecting and De-selecting Repair and Paint Methods for more information.
What do you want to know?
What is Included in the Part Description?
What do you want to do?
Read more information about selecting parts from drawings