|
|
|
Navigating Around a Vehicle
OnePad offers a number of ways of navigating around the vehicle and to specific vehicle zones. In a default configuration, you can use the navigation vehicle, navigation buttons and pictograms.
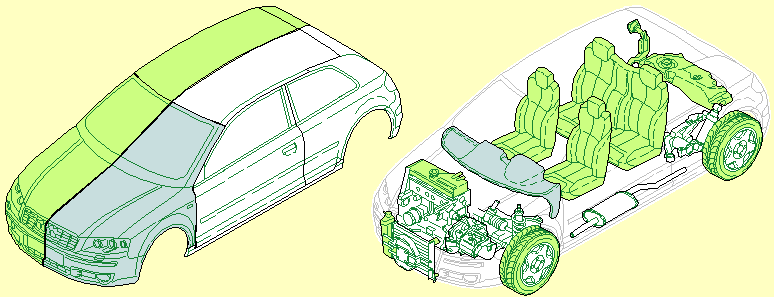
Navigation Vehicle
You can jump directly to a vehicle zone by clicking it in the navigation vehicle. By default, zones which contain damage captured parts are shaded grey. In the example below, one external zone and one internal zone contain damage captured parts.
When you click a vehicle zone, the parts belonging to that zone display in the in the Vehicle Drawings Panel. In addition, the system updates the Model Options, Variants and More Parts tabs with the correct model options, variant and additional parts for that zone.
Navigation Buttons
Button |
Use To |
Additional Information |
|
Return to the navigation vehicle. |
Also available in the Navigation Toolbar. See Understanding the OnePad Interface. |
|
Navigate to the next vehicle zone. |
Order of zones is shown in the Zone Navigation tab. Also available in the Navigation Toolbar. |
|
Navigate to the previous vehicle zone. |
Order of zones is shown in the Zone Navigation tab. Also available in the Navigation Toolbar. |
|
Navigate to the next variant part for the current zone. |
Only available if there are variant parts for the current zone. Also available in the Navigation Toolbar. |
|
Navigate to the previous variant part for the current zone. |
Only available if there are variant parts for the current zone. Also available in the Navigation Toolbar. |
|
Move to the next vehicle zone on the same level in a anti-clockwise direction, for example, from front external to front left door. |
|
|
Move to the next vehicle zone on the same level in a clockwise direction, for example, from front external to front right door. |
|
|
Move to the exterior of the vehicle, for example from front body to front external. |
|
|
Move into the interior of the vehicle, for example, from front external to front body. |
|
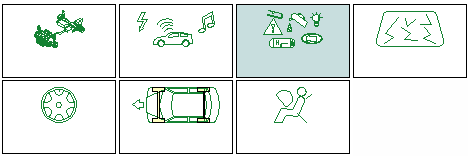
Pictograms
Pictograms provide access to special zones, such as paint, wheel design, accessories and non-standard parts. Simply select a pictogram for the desired zone and begin damage capturing. As with the navigation zone, pictograms are shaded grey to denote that the zone contains parts that have been assigned repair/paint methods.
Notes:
- You can also navigate to a vehicle zone by clicking one in Zone Navigation tab. See Selecting Parts Using the Zone Navigation Tab for more information.
- You can zoom into parts by clicking ![]() in the Toolbar and drag the mouse cursor over the part you want to see in more detail. See Viewing Parts in More Detail.
in the Toolbar and drag the mouse cursor over the part you want to see in more detail. See Viewing Parts in More Detail.