|
|
|
Adding and Editing Annotations
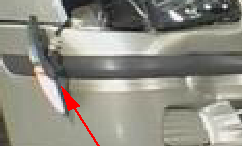
Adding an Arrow
- Click
 or navigate to Annotations > Arrow.
 - Position the mouse cursor at arrow start position.
- Click and hold left mouse button.
- Drag cursor to arrow end position.
- Release left mouse button.
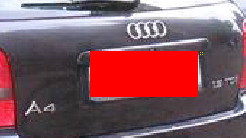
Blocking Out a Section of an Image (Regular Shapes)
- Click
 /
/ /
/ depending on the shape of the section you wish to block out.
 - Position the mouse cursor.
- Click and hold left mouse button.
- Drag cursor to define size and position of shape.
- Release left mouse button.
Blocking Out a Section of an Image (Irregular Shapes)
- Click . Position the mouse cursor.
- Click and release left mouse button. A small square marks the start position.
- Drag cursor to next position.
- Click and release left mouse button.
- Continue with steps 3 and 4 until you have drawn the desired shape.
- Position the cursor over the small square and click the left mouse button.
Editing Annotations
Once you have added an annotation you can edit it in a number of ways, including resizing, re-positioning, and rotating. You can only edit annotations whilst the image is open in the image editing tool. When you click ![]() or click > any changes you have made to annotations will be made permanent and cannot be undone. This is an important consideration particularly when an annotation is used to anonymise images.
or click > any changes you have made to annotations will be made permanent and cannot be undone. This is an important consideration particularly when an annotation is used to anonymise images.
- Click on the annotation.
- From the context menu select an option. For example, to move an annotation, click , re-position the cursor, and click left mouse button.
You can also edit line and fill colour. Refer to for more details.